Chess Tutorial
In this tutorial, we're building a tiny chess game, with one knight on the
board. It's an Angular-specific translation of the original react-dnd
tutorial. The discussion about how to break down this game into
components is worth reading the original for. We will carry on implementing the
three components:
KnightComponent, responsible for rendering one knight pieceSquareComponent, just one black or white square on the boardBoardComponent, 64 squares.
This tutorial assumes you are familiar with the basics of Angular (version 2+).
It also assumes you have read the Quickstart guide, and have attached the
DndModule and the HTML5 backend. Complete source code is available on
GitHub, in four commits: one, two,
three, four, the last of which is the finished
product. You can play with a live demo.
Basic chess visuals
We'll build the KnightComponent first. It is very simple, just a span with a Unicode
knight character in it.
import { Component } from '@angular/core';

@Component({
  selector: 'app-knight',
  template: `<span>♘</span>`,
  styles: [
    `
      span {
        font-weight: 400;
        font-size: 54px;
        line-height: 70px;
      }
    `,
  ],
})
export class KnightComponent {}
Add this component to your module's declarations section, and put
<app-knight></app-knight> somewhere on your page.
Next, we will implement SquareComponent. It is responsible only for changing the colour
of the background and foreground depending on a black input, and rendering
whatever was passed to it inside its tags. Make a SquareComponent, add it to
your module, and include the following very simple HTML template:
<div [ngStyle]="getStyle()">
  <ng-content></ng-content>
</div>
In the body of the component class, add an input for whether the square should be black or not:
Example :@Input() black: boolean;Then implement getStyle() by reading this property.
getStyle() {
    return this.black
        ? { backgroundColor: 'black', color: 'white' }
        : { backgroundColor: 'white', color: 'black' }
}
Note that by attaching these styles directly via [ngStyle], they are not
affected by Angular's view encapsulation, so color will apply to any child
components as well. You could achieve the same by using classes and CSS and
::ng-deep or turning view encapsulation off, but [ngStyle] is good enough
for us.
Then, we want SquareComponent to take up all the space available to it. This
way, Square can be arbitrarily large, and we don't have to be concerned with how
big the whole board is going to be. Include the following in a styles block,
or a linked CSS file.
:host,
div {
  display: block;
  height: 100%;
  width: 100%;
  text-align: center;
}
At this point, you can render one square with a knight in it, like so:
Example :<app-square [black]="true">
<app-knight></app-knight>
</app-square>
If you're paying attention, you'll notice that height: 100% doesn't really
mean anything as none of the parent divs have a height to be 100% of, but it
will make sense later when we put the Square in a div that has an absolute
height.
Then, let's build the board. Start by building out a component that just renders one square.
Example :import { Component } from '@angular/core';
@Component({
selector: 'app-board',
template: `
<div>
<app-square [black]="true">
  <app-knight></app-knight>
</app-square>
</div>
`,
})
export class BoardComponent {}Now, we need to render 64 of them. We will need an *ngFor, but Angular isn't
very good at for loops, so we have to make an array of 64 items.
<div *ngFor="let i of sixtyFour">
  <app-square [black]="true">
    <app-knight></app-knight>
  </app-square>
</div>// ...
export class BoardComponent {
sixtyFour = new Array(64).fill(0).map((_, i) => i);
}
Then, you just have a lot of black squares in a vertical list. Not very chess-y.
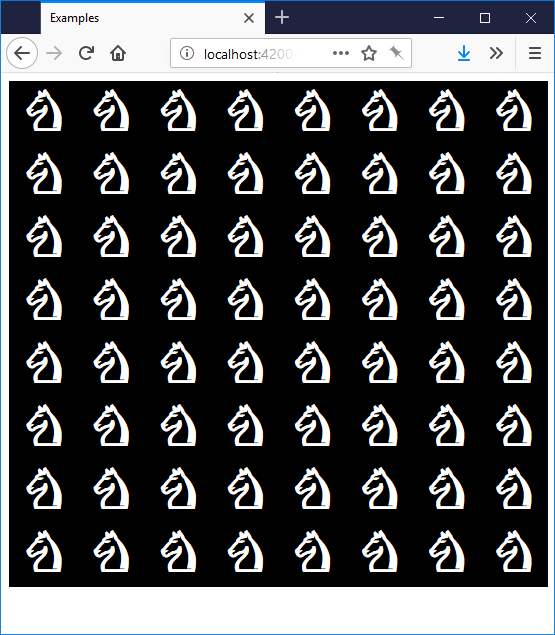
To make it an 8x8 grid, we are going to wrap them all in a <div class="board">, and use the cool new CSS feature, CSS Grid. Make sure you are
using a modern browser. Apply this style to the wrapping .board:
.board {
  width: 100%;
  height: 100%;
  border: 1px solid black;
  display: grid;
  grid-template-columns: repeat(8, 12.5%);
  grid-template-rows: repeat(8, 12.5%);
}
For brevity's sake you could just set .board to a fixed width and height
of 560px. I added a ContainerComponent, just to specify that size, to keep
the board independent of where it will be placed. At this point, you will have
an 8x8 board, but it still doesn't quite look like chess.
Making the chessboard pattern and placing one knight on the board
We're going to need a way to express coordinates on the board. Define a new
interface, to hold x and y coordinates.
export interface Coord {
  x: number;
  y: number;
}
Save it in a new file, coord.ts, and import it into your Board component file.
Then, we need to convert [0..63] (the indices of the *ngFor) to Coord
objects.
export class Board {
    // ...
    xy(i): Coord {
      return {
          x: i % 8,
          y: Math.floor(i / 8)
      }
    }
}
You can then quite easily go from Coord to whether the square is black or not:
    // ...
    isBlack({ x, y }: Coord) {
        return (x + y) % 2 === 1;
    }
Then, pass the result to each SquareComponent, and render only one KnightComponent in the top
left:
<div *ngFor="let i of sixtyFour">
<app-square *ngIf="xy(i) as pos" [black]="isBlack(pos)">
<app-knight *ngIf="pos.x === 0 && pos.y === 0"></app-knight>
</app-square>
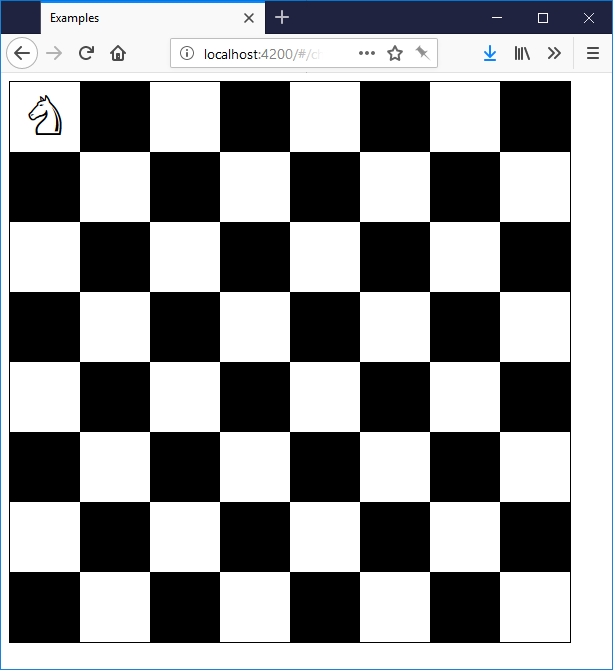
</div>And look at that, we have a chess board with one knight.
Making the knight move around
At this point, your code should look like this commit. You can start fresh from there if you want.
We can clearly represent the position of a knight in one Coord object. You
could store this on the BoardComponent itself:
<app-knight *ngIf="pos.x === knightPosition.x && pos.y === knightPosition.y"> </app-knight>knightPosition: Coord = { x: 2, y: 5 };But we're going to want to read this elsewhere and drive the game logic from it,
and we don't want all the game logic to be trapped inside the BoardComponent.
So, create a GameService, and represent the changing position of the knight
with an RxJS BehaviorSubject<Coord>. This is an ultra-lightweight way of
building an @ngrx-style Store without any boilerplate. It allows us to
'broadcast' updates to the knight's position to any interested components.
Like any Subject, BehaviourSubject can be used as an Observable, and
components can subscribe to it with the | async pipe. But unlike a regular
Subject, it can also have an initial value, and will replay the most recent
value to any new subscribers. This is exactly what we want.
import { Injectable } from '@angular/core';
import { BehaviorSubject } from 'rxjs';
import { Coord } from './coord';

@Injectable()
export class GameService {
  knightPosition$ = new BehaviorSubject<Coord>({ x: 2, y: 5 });

  moveKnight(to: Coord) {
    this.knightPosition$.next(to);
  }
}
As you can see, this is a very simple service. Inject it into your
BoardComponent, and let's put the Knight where the GameService
says it should go.
<app-knight *ngIf="pos.x === (knightPosition$|async).x && pos.y === (knightPosition$|async).y">
</app-knight>knightPosition$ = this.game.knightPosition$;
constructor(private game: GameService) { }This works, but it's very hard to read. A better solution would be to put the
entire *ngFor section in the scope of one subscription. You can do that
without introducing a redundant <div>, by using <ng-container> and a fancy
trick: since knightPosition$|async is always truthy, you can put it in an
*ngIf and give the result a name using the *ngIf="AAA as BBB" syntax. Here's
the entire template:
<div class="board">
  <ng-container *ngIf="knightPosition$|async as kp">
    <div class="square-container" *ngFor="let i of sixtyFour">
      <app-square *ngIf="xy(i) as pos" [black]="isBlack(pos)">
        <app-knight *ngIf="pos.x === kp.x && pos.y === kp.y"> </app-knight>
      </app-square>
    </div>
  </ng-container>
</div>
The resulting template is much clearer.
Now that we have a knightPosition$ and even a GameService.moveKnight()
function, we can hook up a click event on each <app-square> to move the knight
around the board. We're going to remove it later, so just throw it in the
BoardComponent:
<app-square
  *ngIf="xy(i) as pos"
  [black]="isBlack(pos)"
  (click)="handleSquareClick(pos)"
></app-square>handleSquareClick(pos: Coord) {
this.game.moveKnight(pos);
}Click around, and your noble KnightComponent will follow, even though he is breaking
the rules. So, let's add the rules. Amend the GameService to include
a canMoveKnight function, based on the current position and a prospective
position. You can store the currentPosition by subscribing internally to
knightPosition$ and writing out each new value into an instance variable.
import { Injectable } from '@angular/core';
import { BehaviorSubject } from 'rxjs';
import { Coord } from './coord';

@Injectable()
export class GameService {
  knightPosition$ = new BehaviorSubject<Coord>({ x: 2, y: 5 });
  currentPosition: Coord;

  constructor() {
    this.knightPosition$.subscribe(kp => {
      this.currentPosition = kp;
    });
  }

  moveKnight(to: Coord) {
    this.knightPosition$.next(to);
  }

  canMoveKnight(to: Coord) {
    const { x, y } = this.currentPosition;
    const dx = to.x - x;
    const dy = to.y - y;

    return (Math.abs(dx) === 2 && Math.abs(dy) === 1) || (Math.abs(dx) === 1 && Math.abs(dy) === 2);
  }
}
Amend handleSquareClick to check the rules before executing the move:
handleSquareClick(pos: Coord) {
  if (this.game.canMoveKnight(pos)) {
    this.game.moveKnight(pos);
  }
}
And voilà, your knight won't execute an illegal move. We will be replacing this click handler in just a moment, but we have separated the game logic out, so we can reuse those two functions.
Implementing drag and drop
At this point, your code should be look like this commit.
Take a moment to think about what we have to work with. We have:
- A
KnightComponentwhich we want to be able to drag, - Many
SquareComponents on which he could be dropped, - A way to express that state change (
GameService.moveKnight), - And a way to compute where we can drop him (
GameService.canMoveKnight).
Our strategy for implementing drag and drop is this:
- Make the knight draggable
- Turn all the squares into drop targets
- Only allow drops into squares where
canMoveKnightreturnstrue - On each successful drop, call
moveKnight, and Angular will re-render with the new state. - Add some extra visuals to guide the interaction
If you have used other drag and drop libraries, this may seem a bit weird -- what happens to the Knight that we're dragging after we drop him? The answer is, he disappears. After step 1, we will have a knight you can pick up, but nothing interesting will happen when we let go, except that the preview will vanish. We are going to do steps 3 and 4 on the drop targets, which are notified when you drop something on them.
Part 1. Make the knight draggable
First, we need a type to describe what we're dragging, so that the squares can
listen for knights floating above them. Store a constant string "KNIGHT" in
a new file. This is better than typing the same string over and over, and serves
as a single place where all your different chess piece types are defined.
// constants.ts
export const ItemTypes = {
  KNIGHT: 'KNIGHT',
};
Then, make your KnightComponent into a drag source.
- Inject
DndServiceinto yourKnightComponent - Create a dead simple drag source which emits
ItemTypes.KNIGHT, and a simple{}to represent what's being dragged. We don't need any more information than that, but if you were doing >1 piece, you would have to specify which knight was being dragged. This is where you'd do it. - Attach the drag source to the Knight's DOM element.
- In
ngOnDestroy, unsubscribe the drag source.
Here's all four in one go:
Example :import { Component } from '@angular/core';
import { DndService } from '@ng-dnd/core';
import { ItemTypes } from './constants';
@Component({
selector: 'app-knight',
// step 3
template: `<span [dragSource]="knightSource">♘</span>`,
styles: [
`
span {
font-weight: 700;
font-size: 54px;
}
`,
],
})
export class KnightComponent {
// step 2
knightSource = this.dnd.dragSource(ItemTypes.KNIGHT, {
beginDrag: () => ({}),
});
// step 1
constructor(private dnd: DndService) {}
// step 4
ngOnDestroy() {
this.knightSource.unsubscribe();
}
}Try dragging your little knight, and you'll find that you can. But the interaction is slightly confusing - you can't tell at a glance that the knight is conceptually in-flight, it just looks like there are two knights. So let's listen to whether we are dragging the knight, and make the stationary one look different while we are.
- Use the
DragSource.listenandDragSourceMonitor.isDraggingmethods to get an observableisDragging$on yourKnightComponent. - Use that observable in your template to change styles
// component
// (this is an Observable<boolean>)
isDragging$ = this.knightSource.listen(monitor => monitor.isDragging());<!-- template -->
<span [dragSource]="knightSource" [class.dragging]="isDragging$|async">♘</span>/* in the style block */
.dragging {
opacity: 0.25;
}Now, the knight on the board will be a bit transparent when you've picked it up.
You could set it to opacity: 0, but in chess, players like to know where the
piece came from. @ng-dnd makes no assumptions about how to render
any elements, so you can always customise their appearance at any stage of the
drag and drop process.
Part 2: Make the squares into drop targets
Because canMoveKnight has to be computed once per square, each square is going
to have to know where it is on the board. However, the SquareComponent is
perfectly good at what it does. We don't want to ruin a good thing. Let's wrap
it with another component, BoardSquareComponent, that will handle the drag and drop,
and leave the black and white rendering to SquareComponent. This is a basic wrapper
which preserves the size of the underlying squares:
import { Component, Input } from '@angular/core';

@Component({
  selector: 'app-board-square',
  template: `
    <div class="wrapper">
      <app-square [black]="black">
        <ng-content></ng-content>
      </app-square>
    </div>
  `,
  styles: [
    `
      :host,
      .wrapper {
        display: block;
        position: relative;
        width: 100%;
        height: 100%;
      }
    `,
  ],
})
export class BoardSquareComponent {
  @Input() position: Coord;
  get black() {
    const { x, y } = this.position;
    return (x + y) % 2 === 1;
  }
}
Add it to your module, and replace the <app-square> in the BoardComponent
template with this:
<app-board-square *ngIf="xy(i) as pos" [position]="pos">
  <app-knight *ngIf="pos.x === kp.x && pos.y === kp.y"></app-knight>
</app-board-square>
Then, we're going to add a drop target to BoardSquareComponent and attach it
to that wrapper div. It's very similar to the drag source.
- Inject
DndService - Create a drop target
- Attach it to the DOM
- Unsubscribe it in
ngOnDestroy.
import { Component, Input } from '@angular/core';
import { DndService } from '@ng-dnd/core';
import { ItemTypes } from './constants';

@Component({
  selector: 'app-board-square',
  template: `
                         <!-- step 3 -->
    <div class="wrapper" [dropTarget]="target">
      <app-square [black]="black">
        <ng-content></ng-content>
      </app-square>
    </div>
  `,
  styles: [
    `
      :host,
      .wrapper {
        display: block;
        position: relative;
        width: 100%;
        height: 100%;
      }
    `,
  ],
})
export class BoardSquareComponent {
  @Input() position: Coord;
  get black() {
    const { x, y } = this.position;
    return (x + y) % 2 === 1;
  }

  // step 2
  target = this.dnd.dropTarget(ItemTypes.KNIGHT, {});

  // step 1
  constructor(private dnd: DndService) {}

  // step 4
  ngOnDestroy() {
    this.target.unsubscribe();
  }
}
Parts 3 and 4: make the knight move around on drop
Next up is to incorporate the game logic, and to actually move the knight. We're
going to use two hooks in the drop target: DropTargetSpec.canDrop and
DropTargetSpec.drop. We have already done the heavy lifting for both in
GameService. Inject GameService in the constructor, and incorporate its
methods.
target = this.dnd.dropTarget(ItemTypes.KNIGHT, {
    canDrop: monitor => {
        return this.game.canMoveKnight(this.position);
    },
    drop: monitor => {
        this.game.moveKnight(this.position);
    }
});

constructor(private dnd: DndService, private gme: GameService) {}
Now you should be able to drag your knight around the board!
Part 5: Extra visuals
We have some guidance already about where you can drop a knight. The mouse cursor gets a different icon depending on whether you can or not. But usually, this is not enough of an indicator. Good UI means making difficult things obvious and learnable. Someone who has never seen a knight should be able to figure out where one can go.
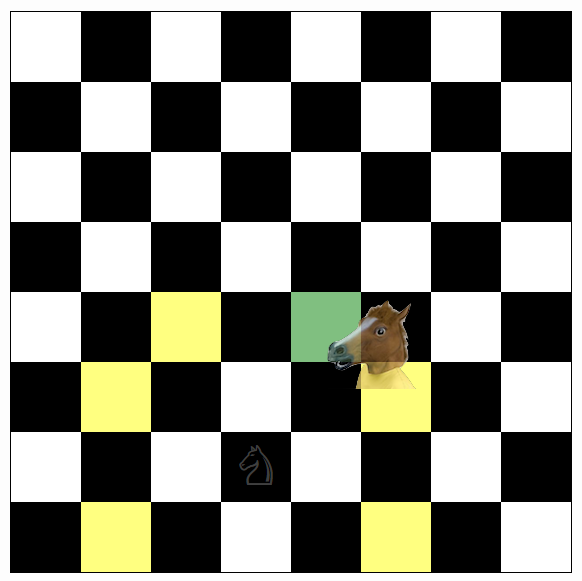
In that spirit, we will change the colour of the squares while dragging, depending on whether they represent a valid move, and colour the square you're hovering over either red or green depending on whether dropping would result in a move.
The procedure is almost identical to what we did for the Knight earlier on.
- Use the
DropTarget.listen,DropTargetMonitor.canDropandDropTargetMonitor.isOvermethods to observe changes in drag state - Use observables in your template to change styles on an overlay
div.
// We are assuming RxJS 5.5+ here, but you can use plain Observable.map
import { map } from 'rxjs/operators';

// template:<div class="wrapper" [dropTarget]="target">
<app-square [black]="black">
<ng-content></ng-content>
</app-square>
<div class="overlay" *ngIf="showOverlay$|async" [ngStyle]="overlayStyle$|async"></div>
</div>export class BoardSquareComponent {
// ...
target = this.dnd.dropTarget(ItemTypes.KNIGHT, {
// ...
});
collected$ = this.target.listen(m => ({
canDrop: m.canDrop(),
isOver: m.isOver(),
}));
showOverlay$ = this.collected$.pipe(map(c => c.isOver || c.canDrop));
overlayStyle$ = this.collected$.pipe(
map(coll => {
let { canDrop, isOver } = coll;
let bg: string = 'rgba(0,0,0,0)';
if (canDrop && isOver) {
bg = 'green';
} else if (canDrop && !isOver) {
bg = 'yellow';
} else if (!canDrop && isOver) {
bg = 'red';
}
return {
position: 'absolute',
top: 0,
left: 0,
height: '100%',
width: '100%',
zIndex: 1,
opacity: 0.5,
backgroundColor: bg,
};
})
);
// ...
}Here's what it looks like:

Lastly, we're going to customize the drag preview (that little knight that
follows the mouse around). @ng-dnd has some very powerful ways to
customize this, but we're going to use a simple image. It's quite simple:
- Create an
Image - Wait for it to load
- Connect it to the
knightSourceas a drag preview
We can do this in just a few lines.
Example :// ...
export class KnightComponent {
// ...
ngOnInit() {
const img = new Image();
img.src = // ... long 'data:image/png;base64' url
// regular 'https://' URLs work here too
img.onload = () => this.knightSource.connectDragPreview(img);
}
}For that long URL, see this file.
Then we get a funky horse as our preview.
Have a go with the live demo here.